
I have questions about using Wi-Fi Calling

What happens if I step out of my Wi-Fi coverage area while on a call?

When you go out of range of your Wi-Fi coverage area your call will disconnect. You will need to re-dial after you are in cellular coverage or re-connect to another Wi-Fi network. Likewise, if you start your call on the cellular network and enter a Wi-Fi-only zone, your call will terminate.

Why does the quality of my Wi-Fi call vary?

Call quality cannot be assured with Wi-Fi Calling, as it is dependent on the Wi-Fi and Internet connection you are using. Cellular service provides higher assurance of call quality, since calls are on a dedicated spectrum, using carrier-grade equipment and maintenance. Wi-Fi Calling is configured to default to cellular service whenever possible to deliver the best quality calling experience.

Why does my phone default to cellular calling?

By staying on a cellular connection, the quality of service is always maintained. The quality of your calls over Wi-Fi Calling will greatly depend on your Wi-Fi connection to the Internet. Since Wi-Fi is shared with other devices and other Wi-Fi networks, it will be more prone to interference, which may cause call quality issues. As well, Wi-Fi Calling depends on the Internet quality and available bandwidth. Slow Internet connections and public Wi-Fi Hotspots tend to have very low Internet quality. Cellular networks do not have these interference issues. Bell's HSPA and LTE Mobile networks can provide a higher quality of service and better user experience.

Emergency calls will default to the mobile network whenever it is accessible and will be treated as usual. When the mobile network is not available, your emergency call will be sent to a call center that will ask you where you are calling from, then forward your call to the appropriate 9-1-1 response centre. If you are unable to verbally communicate your location, help will be dispatched to the address in your device settings. It is important that you update this address to reflect your most up-to-date whereabouts when you use Wi-Fi Calling.

In addition, T911 and special numbers (e.g., services offered to the public like 211, 311, 511, 711, 811, as well as 0+ operator calls or calls starting with the symbols # or *) are not accessible over Wi-Fi.

Why is Wi-Fi Calling only available on unlimited nationwide calling plans?

With an unlimited nationwide plan, any confusion over charges for calling locations within Canada is eliminated, whether you are calling over Wi-Fi or cellular.

Will I be charged for calls to locations outside of Canada?

Yes, calls outside of Canada will incur toll charges. Also, calling outside of North America requires International Calling to be enabled on your account. International Calling charges are the same over Wi-Fi Calling and the cellular network.

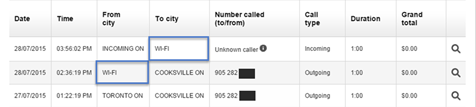
How do I track calls made or received on Wi-Fi?

Login to MyBell and refer to the usage tab. Calls made or received on Wi-Fi will be marked Wi-Fi.

Wi-fi_calling_FAQ_image

How much data will I use when making a Wi-Fi Call?

Wi-Fi Calling uses approximately 1MB/minute. Data usage charges may apply to Wi-Fi calls made using your Internet service.

Why is Wi-Fi Calling not available when roaming?

At this time Wi-Fi Calling is only available within Canada.

Why do I need to input an emergency address when setting up Wi-Fi Calling?

Emergency personnel can’t track your location when you call using Wi-Fi Calling. If you cannot verbally communicate your location, help will be dispatched to the address in your device settings. It is important that you update this address to reflect your most up-to-date whereabouts when you use Wi-Fi Calling.

How do I know that I am able to make a Wi-Fi call?

Once you see the Wi-Fi Calling indicator on the status bar of your device, you can make a Wi-Fi call. Wi-Fi calling uses the same native dialler and contact list on your device as for cellular, making it easy to use.

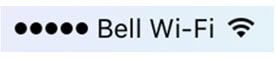
iPhone Wi-Fi Calling indicator:

Standard Wi-Fi indicator

iPhone Standard Wi-Fi indicator

Wi-Fi Calling indicator

iPhone Wi-Fi Calling indicator

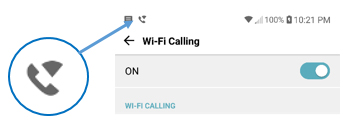
Android Wi-Fi Calling indicator:

Android Wi-Fi Calling indicator

Which special numbers can I call?

Some of the special numbers you are able to call with Wi-Fi Calling are: 310-BELL, 411, 611, 911, 999 and 2321.

I was unable to activate Wi-Fi Calling, what do I do?

There are a number of reasons you could be unable to activate:

  1. You do not have a supporting smartphone, postpaid rate plan or LTE SIM card. To review eligible rate plans, devices and SIM cards visit bell.ca/wificalling for the latest information.
  2. Data could be blocked on your account. Contact us to have the block removed.
  3. Wi-Fi Calling is not compatible with T911.
  4. If you continue to have trouble, try restarting your device. View troubleshooting tips for your device

Note: in some instances, it may take up to 24 hours to activate Wi-Fi Calling. You’ll get a text message to go back into your phone settings and complete the activation process.

How do I disable Wi-Fi Calling?

To disable Wi-Fi Calling, go into the phone settings and toggle Wi-Fi Calling to OFF. If you would like to remove Wi-Fi Calling from your account, visit bell.ca/mybell. Once removed, you may receive a pop-up notification advising that Wi-Fi and LTE calls have been turned off.

iPhone

  1. Select Settings.
  2. Scroll and Select Phone.
  3. Select Wi-Fi Calling.
  4. Select Wi-Fi Calling on This iPhone.

    (For Dual SIM: “Primary” or “Secondary”)

  5. Select Enable.
  6. Select Continue.
  7. Wait while Wi-Fi Calling activates.
  8. Review the Wi-Fi Calling Terms and Conditions. Select Accept.
  9. Select the address fields (e.g., Address 1, City, etc.) to enter your emergency address.
  10. Select Save.

Note: On Dual SIM compatible devices with two phone lines activated, Wi-Fi calling lets you use both lines simultaneously. See bell.ca/esim

Apple Watch

  1. Select the Watch app on your iPhone.
  2. Select Cellular.
  3. Select the i icon.
  4. Select Manage Bell Account.
  5. Select Wi-Fi Calling.
  6. Select Continue.
  7. Select Enable.
  8. Review the Wi-Fi Calling Terms and Conditions.
  9. Select Accept and Continue.
  10. Select the address fields (e.g., Address 1, City, etc.) to enter your emergency address.
  11. Select Continue.
  12. Select Confirm and Continue.

LG

  1. Select Settings.
  2. Select Call.
  3. Select Wi-Fi Calling.
  4. Select Tap to set up Wi-Fi Calling or change your Emergency Address.
  5. Enter your mobile phone number. Select Continue.
  6. You will receive a text message with a verification code. Enter the verification code and Select Continue.
  7. Select Accept and Continue.
  8. Select the address fields (Address*, Apartment / Suite / Unit Number, etc.) to enter your emergency address.
  9. Select Submit.
  10. Wait while Wi-Fi Calling activates.
  11. Select Return to Settings.
  12. Select the Wi-Fi Calling slider to turn on Wi-Fi Calling.

Samsung

  1. Select Phone.
  2. Select the Menu icon.
  3. Select Settings.
  4. Scroll and Select Wi-Fi calling.
  5. Select Click here to register for Wi-Fi Calling or to update your existing Emergency Address.
  6. Enter your mobile phone number.
  7. Select Continue.
  8. You will receive a text message with a verification code. Enter the verification code and select Continue.
  9. Select Accept and Continue.
  10. Select the address fields (Address*, Apartment / Suite / Unit Number, etc.) to enter your emergency address.
  11. Select Submit.
  12. Wait while Wi-Fi Calling activates.
  13. Select Return to Settings.
  14. Select the Wi-Fi Calling slider to turn on Wi-Fi Calling.

Google and Motorola

  1. Select Settings.
  2. Select Network and Internet.
  3. Select Mobile Network.
  4. Select Advanced.
  5. Select Wi-Fi Calling.
  6. Select the Wi-Fi Calling slider to turn on Wi-Fi Calling.
  7. Enter your mobile phone number. Select Continue.
  8. You will receive a text message with a verification code. Enter the verification code and select Continue.
  9. Select Accept and Continue.
  10. Select the address fields (Address*, Apartment / Suite / Unit Number, etc.) to enter your emergency address.
  11. Select Submit.
  12. Wait while Wi-Fi Calling activates.
  13. Select Return to Settings.
  14. Select the Wi-Fi Calling slider to turn on Wi-Fi Calling.

Huawei

  1. Select Settings.
  2. Select Wireless and Networks.
  3. Select Mobile Network.
  4. Select Wi-Fi calling.
  5. Select Wi-Fi Calling to ON.
  6. Enter your mobile phone number. Select Continue.
  7. You will receive a text message with a verification code. Enter the verification code and select Continue.
  8. Select Accept and Continue.
  9. Select the address fields (Address*, Apartment / Suite / Unit Number, etc.) to enter your emergency address.
  10. Select Submit.
  11. Wait while Wi-Fi Calling activates.
  12. Select Return to Settings
  13. Select the Wi-Fi Calling slider to turn on Wi-Fi Calling.

Note: If your emergency address is the same as your billing address, you can select Use my billing address to auto-fill the fields

iPhone

  1. Select Settings.
  2. Scroll and select Phone.
  3. Select Wi-Fi Calling.
  4. Select Update Emergency Address.
  5. Select the address fields (e.g., Address 1, City, etc.) to enter your emergency address.
  6. Select Save.

Apple Watch

  1. Select the Watch app on your iPhone.
  2. Select Cellular
  3. Select the i icon.
  4. Select Manage Bell Account.
  5. Select Wi-Fi Calling.
  6. Select Update emergency address.
  7. Select the address fields (e.g., Address 1, City, etc.) to enter your emergency address.
  8. Select Continue.
  9. Select Confirm and Continue on the review page.

LG

  1. Select Settings.
  2. Select Network and internet.
  3. Select Call.
  4. Select Wi-Fi Calling
  5. Select Tap to set up Wi-Fi Calling or change your Emergency Address.
  6. Select Submit.
  7. Wait while Wi-Fi Calling activates.

Samsung

  1. Select Phone.
  2. Select the Menu icon.
  3. Select Settings.
  4. Scroll and select Wi-Fi calling.
  5. Select Click here to register for Wi-Fi Calling or to update your existing Emergency Address.
  6. Select Submit.

Google and Motorola

  1. Select Settings.
  2. Select Network and Internet.
  3. Select the Mobile Network.
  4. Select Advanced.
  5. Select Wi-Fi Calling.
  6. Select the address fields (Address*, Apartment / Suite / Unit Number, etc.) to enter your emergency address.
  7. Select Submit.

Huawei

  1. Select Settings.
  2. Select Wireless and Networks.
  3. Select Mobile Network.
  4. Select Wi-Fi Calling.
  5. Select Click here to register for Wi-Fi Calling or to update your existing Emergency Address.
  6. Select the address fields (Address*, Apartment / Suite / Unit Number, etc.) to enter your emergency address.
  7. Select Submit.

Note: If your emergency address is the same as your billing address, you can select Use my billing address to auto-fill the fields