What do I need to know about the controls on the front and back panels of my 4K Whole Home PVR
Learn what the lights, buttons and ports on your 4K Whole Home PVR mean and what they’re used for.
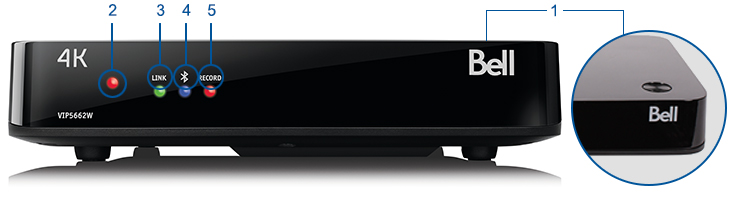
Front of receiver
-
Power button
Located on top of the receiver. Push the power button to turn your receiver on or put it in stand-by mode.
- Stand-by mode: Your PVR will operate at a lower power consumption, and PVR functions such as recording will be available.
- Restart the receiver: To restart the receiver, hold the power button down for 5 seconds or longer.
- Power light
This light is only active while the 4K Whole Home PVR is restarting. -
Link light
- Solid green:Solid green: Your PVR is connected to your home network and Fibe TV service.
- Flashing green: Your PVR is connecting to the Fibe TV service.
- No light: Your PVR is not connected to your home network nor to your Fibe TV service.
- If your receiver was just powered on, please wait up to 10 minutes for the light to turn solid green. Ensure that the Ethernet cable is properly secured in the back of the receiver.
-
Bluetooth light
- Solid blue: Your Bluetooth Slim remote is paired with your receiver. You are able to use your remote to control your 4K Whole Home PVR without pointing it directly to it.
- If the Bluetooth light is flashing, please wait two minutes as your Bluetooth Slim remote is being paired to your receiver.
-
Record light
- Solid red: Your 4K Whole Home PVR is recording content.
- Off: Nothing is being recorded.
Back of receiver
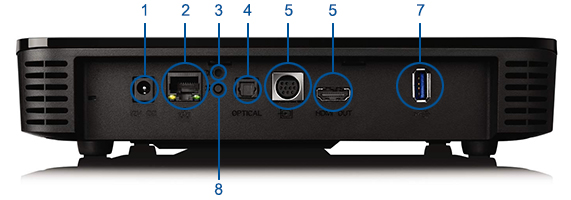
- 12V DC: An electrical port that provides power the 4K Whole Home PVR. Connect the supplied DC power adapter to this port.
- Ethernet input: A home network port that supports speeds of up to a gigabit to connect the 4K Whole Home PVR to the Bell Home Hub modem using an Ethernet (RJ-45) cable.
- Reset (DR): A recessed button used to reset your 4K Whole Home PVR. Use only when advised by a Bell agent.
- Optical audio output: Optional high-definition audio output typically used to send the sound of the 4K Whole Home PVR to a home theatre system (5.1 surround sound) or sound bar. Please refer to your audio equipment’s manual or manufacturer for information on connecting and setting up your system.
- Audio/video port: Optional audio/video output for use with TVs that do not have an HDMI port. It does not support 4K resolution. With an audio/video adapter (not provided), the port can be used with component or composite cables. Refer to your TVs manual or manufacturer for more information.
- This cable will allow you to output video and audio. See chart below:
-
Component (Video only) Red, green, blue Composite (Video and audio) Yellow (video), red and white (Audio)
- HDMI output: The preferred output to take full advantage of the capabilities of your 4K Whole Home PVR as it supports both 4K video and high definition audio. Use the cable supplied with the 4K Whole Home PVR to connect this port to an HDMI input (HDMI 2.0 or DHCP 2.2) on your 4K TV or home theatre system.
- USB: USB 3.0 port reserved for use by a technician.
- Button used to pair the Bluetooth remote to the 4K Whole Home PVR. Typically not required as the Bluetooth remote that comes with your 4K PVR pairs automatically.