Bell MTS Commercial Desktop Fax
This service is only available to MTS customers in Manitoba. To find support for your region, please select your province.
Desktop Fax allows you to send and receive faxes in email format, access your faxes from a mobile device or an email client. With Internet access, Desktop Fax allows you to send faxes without using a fax machine or a second phone line from anywhere in North America.
For some general help please see the options below. For more detailed assistance, see Desktop Fax user guide (PDF 949 KB).
Log in page to Bell MTS Commercial Desktop Fax
- Navigate to your Desktop Fax Login page at: https://mtsdesktopfax.com.
- Enter in your Email Address or Fax Number.
- Enter in your Desktop Fax password.
- Click Log in.
Bell MTS Commercial Desktop administration panel navigation
When you first launch Desktop Fax Fax Management, the "Getting Started with Desktop Fax" screen is loaded as your initial menu. The Main Menu bar remains static throughout all of the Desktop Fax Fax Management and you will be able to navigate to whichever section you wish by clicking on the menu options.
Main menu
When you log in to Desktop Fax, the main menu is listed with details regarding each option. Once you select an option, the main menu moves to the top-right corner of the page. These options are available:
- Inbox - The Inbox page allows you to manage received faxes. Each fax is stored in the Inbox for 30 days, during which time, you can view, download as a PDF or TIFF, move to an archive, or delete.
- Send Fax - The Send Fax page opens a screen that allows you to create and send faxes online.
- Outbox - The Outbox button opens a screen that allows Desktop Fax users to view the queue of all outbound faxes.
- Archive - The Archive button opens a screen that displays faxes that have been archived on our system for 30 days. Desktop Fax users are able to manage sent and received faxes here.
- Contacts - The Contacts button allows Desktop Fax users to create, manage and store fax and email contacts.
Sub Menu / Secondary Menu
- Home - The Home link directs you to your Inbox.
- Getting Started - The Getting Started link directs you to the "Getting Started with Desktop Fax" screen.
- Help - The Help link will guide you through managing fax to email.
- Settings - The Settings link allows you to update your account information: company details, your personal signature.
- Logout - The Logout link will log you out of the current session of Desktop Fax.
Managing the Bell MTS Desktop Fax inbox
The Inbox allows you to manage all received faxes. Faxes are stored in the Inbox for 40 days. All faxes that exceed 40 days will automatically be sent to the email address assigned to your Desktop Fax account in Portable Document Format (PDF) before they are deleted from our system.
The following table provides a brief description for each icon:
| Utility | Description |
|---|---|
Preview

|
See a thumbnail preview of your fax. |
View

|
View a full-size version of your fax. |
Rotate Fax

|
Rotate your fax to adjust the view. |
Email fax document

|
Send a received fax as an email attachment. |
Download PDF

|
Download your fax as a PDF document. |
Download TIFF

|
Download your fax as a TIFF document. |
Move to Archive

|
Move the fax to your archive folder. |
Delete

|
Permanently delete the selected fax. |
Sending a fax through Bell MTS Commercial Desktop Fax
-
Enter the fax numbers in the Destination Fax numbers box.
Note:
If you choose to enter multiple fax numbers please make sure you separate them by semi-colons. You can enter the fax number(s) manually or you can select from among your saved contacts by clicking on Select contacts. When you click on Select contacts a new window will open where you can add the wanted fax numbers.
- Select Files to Fax by clicking Browse. You may attach up to three files.
- Select the checkbox if you wish to Add a Cover Page.
- Select from the dropdown box the Language you wish the cover page to be in (If more than one language is available).
-
Enter the requested information:
- Person - (to whom will you address this fax)
- Company - (company name)
- Location - (location)
- Phone Number – (phone number)
- Regarding - (subject line)
- Comments - (message)
If you wish to change the cover page template click on Change cover page. A new window will open where you will be able to choose a new template.
- Click on the magnifying glass to zoom in on a chosen template
- Click on the chosen template. As soon as you click on a template it will be displayed with a check mark.
- Click Apply to save the changes or Cancel to dismiss the changes.
-
Click Send to queue your fax for delivery or Cancel to discard changes. Your fax will be placed in the Outbox with status message indicating success/failure of delivery.
Note:
An attached file cannot exceed 5 MB in size.
Bell MTS Commercial Desktop Fax outbox/archive
The Outbox contains messages that have been queued for sending. A maximum of twenty faxes are queued at any given time (each phone number in a fax with multiple recipients is counted as a separate fax in the queue). The speed at which the queue clears will depend on the complexity of the images being faxed and the length (number of pages) of each fax.
Desktop Fax will make five attempts to send your fax to each recipient. Once a fax has been successfully sent, the fax will be automatically moved from Outbox to your Archive folder; you will also receive a notification by email that the fax was sent successfully.
When a fax is queued in the Outbox it can be removed using the
Delete icon
located in the right-hand column.
Faxes that have been successfully sent are automatically moved into Archive. In order for Inbox faxes to be moved into Archive, you must click on the Move to Archive icon. The Archive provides you with multiple ways to search for sent and received messages. The Management toolbar in Archive uses the same icons and functionality as Management Utilities.
Note:
Faxes are permanently removed from Archive after 40 days.
Search for a fax in Bell MTS Commercial Desktop Fax archive
-
Enter in Keywords within a fax you wish to search for.
-
From the Company drop-down menu, select the company name.
-
From the Sent/Received drop-down menu, specify either Sent or Received or Both.
-
From Start Date and End Date select the date. This date refers to the time period within which you may have received or sent the fax that you are searching for.
-
Click Search.
Note:
Faxes are permanently removed from Archive after 40 days.
Emaliing to fax with Bell MTS Commercial Desktop Fax
The email to fax feature allows you to send a fax from any of your existing Desktop Fax account numbers. You do not need to log in to the Desktop Fax application to use this feature.
Note:
If you have multiple fax numbers associated with your account, you must specify which number you are sending the fax from.
Send Fax from Email
- Login To MTSDesktopFax Admin email account
- Create New email message
- Enter "To" field as recipient@mtsdesktopfax.com
-
Replace "recipient" with the destination fax #
- E.g.: 18005555555@mtsdesktopfax.com
- Enter Subject and body
- Send Message
Note:
Emails must be sent from the MTSDesktopFax admin email account
Bell MTS Commercial Desktop Fax account usage
Your Desktop Fax account has a monthly limit. This limit varies by the specific package type you have chosen.
Once an account has exceeded its monthly page quota, the user will be charged on a per-page basis. Quota warnings are emailed to the user at 80%, 90%, and 100%.
Bell MTS Commercial Desktop Fax - Additional accounts
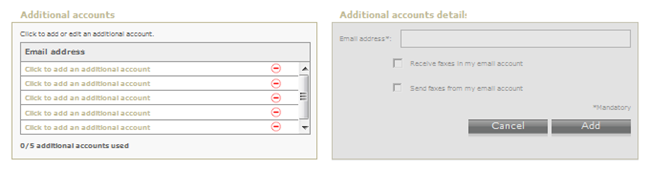
You can add up to 5 additional accounts
Add a New Account
- Click on Click to add an additional account in the "Additional accounts" section.
- The "Additional accounts details" box on the right will become active.
-
Enter an Email Address in the box provided.
Note: Email address is mandatory.
-
Check off one or both: Receive faxes in my email account or Send faxes from my email account.
Note: You must choose at least one of the options.
- Click Add to add the newly created account or Cancel to dismiss all the changes made.
View an Existing Account
- Click on the magnifying icon to view the details of the account.
- The "Additional accounts details" section on the right will become active and it will display the details of the chosen account.
Delete an Account
-
Click on the (-) to delete an account.
- A pop-up will ask you to confirm the deletion of the chosen account.
Bell MTS Commercial Desktop Fax - Blocked numbers
Note: The proper fax number format includes only numbers and dashes. The area code must be included.
Search for a Blocked Fax Number
- Enter a fax number in the Fax Number field.
-
Click on Search. The results will be displayed within the same page.
Note: The proper fax number format includes only numbers and dashes. The area code must be included.
Block a Fax Number
- Enter a fax number in the Fax Number field.
- Click Block to block the fax number entered.
Delete a Blocked Fax Number
- Enter a fax number in the Fax Number field.
-
Click on Search. The results will be displayed within the same page.
Note: This search will only display blocked fax numbers.
- Click on the (-) icon besides each number in order to delete the number.
- Click Yes to confirm the deletion or click No to cancel the deletion.
Bell MTS Commercial Desktop Fax - Contacts
Fax Management allows you to maintain a contact list of fax numbers. Fax contacts may be used when sending or replying to a fax.
Creating Fax Contacts List
- Select the Fax Contacts tab.
- In "Contact list" click on Add a contact.
- Fill in all required information in the Contact details section.
- Click the Add button to save changes or Cancel to discard the entry.
Import Contacts to Fax Management
- Select the Contact Import tab.
-
In "Import Details" specify:
- File Name (Select a CSV File form your computer to import into Fax Management).
- Duplicate Contacts (Ignore or Overwrite).
-
Click the Import button to proceed or Cancel to discard.
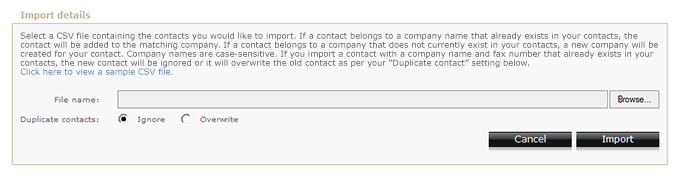
Note: The CSV (Comma Separated Value) file must follow a specific format in order to be successfully imported; click the View a sample CSV file link located above the "File Name" field for more information.
Bell MTS Commercial Desktop Fax - Manage your Desktop Fax settings
The Settings link allows you to update your account information, company details and your personal signature as well as your preferences in terms of your cover letter template and attachment format.
Contact Details
In this section you can edit the contact details that will appear on the cover letter of your fax. The fields that you can edit are: Your name, Company, Location, Phone number, Email signature.
- Enter your data in the text fields provided.
- Click Apply to save changes or Cancel to dismiss the changes made.
Cover Page
In this section you can chose a cover page template.
- Click Zoom to zoom in on a chosen template.
- Click on the chosen template. As soon as you click on a template it will be displayed with a check mark.
- Click Apply to save the changes or Cancel to dismiss the changes.
Preferences
In this section you can choose the format of the fax attachment as well as the language in which you would like to use the application.
- Click on the Language drop-down menu to choose the preferred language.
- Choose the attachment format you wish by clicking on the radio button next to PDF or TIFF.
- Check off Email me a copy of all automatically deleted faxes that have exceeded their storage period if you would like to have the deleted faxes that exceeded their storage period sent to your email.
- Check off Use a cover page for faxes sent from my email account if you would like to use a cover page when sending faxes from your email account.
- Click Apply to save the changes made or click Cancel to dismiss the changes.
Preferences
In this section you can change your current password.
-
1
- Enter your existing password in the Current password field. 2
- Enter a new password in the New Password field. 3
- Enter your new password again into the Confirm password field. 4
- Click Apply to save the changes made or Cancel to dismiss the changes made.
Password
In this section you can change your current password.
- Enter your existing password in the Current password field.
- Enter a new password in the New Password field.
- Enter your new password again into the Confirm password field.
- Click Apply to save the changes made or Cancel to dismiss the changes made.
Note: Your password must be between 5-10 characters.