How to use the Interlogix SimonXT panel
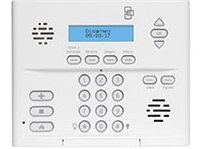
Your panel: Interlogix SimonXT panel
Not your panel?Arming
Arming in Stay mode
In Stay mode, you arm all doors and windows (securing the perimeter of your home) without activating interior motion detectors.
- Press the Doors + Windows button. The touchscreen displays a countdown exit timer.
Arming in Away mode
In Away mode, you arm all exterior doors and windows as well as interior motion detectors.
- Press the Motions button. The touchscreen displays a countdown exit timer.
Disarming
- When entering the premises, enter your user code before the entry delay expires.
- If the system is armed in Stay mode while inside the premises, press Disarm then enter your user code.
Emergency panics
You can use emergency panic buttons to notify the Bell Smart Home central monitoring station of different emergencies in your location. Emergency panics are used when you need immediate assistance. Below are the types of panics, an example of when you may want to use them and what each of them does.
Police: Use when you need police assistance
When someone is attempting to break in.
By selecting police emergency panic, you’ll set off the alarm (perhaps scaring away the potential intruder) and notify us that you’re in an emergency that requires police response. We’ll contact you by either two-way voice or phone. We’ll also notify police of the emergency at your home and request immediate response.
Fire: Use when you need assistance from the fire department
If your home is on fire, gather everyone up to exit immediately. Don’t even take time to look for your mobile phone. On the way out, trigger a Fire emergency with two quick taps on your panel.
By selecting the Fire emergency panic, you’ll set off the alarm (perhaps alerting someone who is still inside your home) and notify us that you’re in an emergency that requires a response from the fire department. We’ll contact you by either two-way voice or phone. If you do not respond, we’ll attempt to reach one of your key contacts. We then notify the fire department of the emergency at your home and request immediate response.
Emergency: Use when you need medical assistance
When you’re hurt and unable to call out and alert others that you need help. Go to your system panel and set off the Auxiliary/Medical emergency panic.
By selecting Auxiliary/Medical emergency panic, you’ll set off the alarm (alerting others of an emergency) and notify us that there is a medical emergency at your home. We’ll contact you by either two-way voice or phone.We then notify the proper authorities of the situation at your home and request immediate response.
NOTE: Life Safety detectors have an expiry date
Most smoke detectors expire 10 years after the manufacturing date, and most carbon monoxide detectors expire after 6 years. Ensure all of your smoke and carbon monoxide detectors are up to date as they may not function correctly once expired. To check your detectors, look for an expiry date listed on the back or side of the device.
When you need to replace a detector, contact Bell Smart Home to learn about your options. If you choose, or have already chosen, to purchase a replacement smoke or carbon monoxide detector from another provider, please be aware that the device will not be monitored as part of your Bell Smart Home service.
To bypass a sensor means to deactivate a security sensor (or zone) on your security system. If someone enters a bypassed area, the alarm will not sound off. You can still arm and secure your system in other areas.
There are a number of reasons to use the bypass function. You may want to leave a specific door or window open. It can also be useful when a sensor is not working (i.e., low battery). You could still arm the rest of your system until a technician can come fix the malfunctioning sensor.
To bypass a sensor:
There are two ways to Bypass a sensor on your SimonXT panel
Indirect method:
During the entry delay, the panel announces the open sensor. Press the Bypass button and the panel will announce which sensor is bypassed (e.g., back door bypassed). The panel will then arm everything else. You will be able to open and close the door or window as many times as you want without setting off the alarm. To cancel a bypass, simply disarm the panel.
Direct method:
If your system is already armed and the entry delay has finished, follow the steps below to bypass a sensor.
- Press the Bypass button.
- Enter your master code.
- Find the sensor (Sn) you wish to bypass and press OK. The screen display will indicate which sensor is bypassed.
- Wait five seconds and the system display will return to the home screen.
How to change the batteries of the Simon XT/Interlogix panel.
-
Disconnect the power.
Locate the power plug for your alarm system and remove it from the outlet on the unit. You may need to use a screwdriver to remove a screw holding the plug in place.
-
Open the system.
To open the system, first remove the small screw at the top of the unit, if present. Then press the two top tabs on either side of the screw and gently pull the system away from the mounting plate. Allow the system to rotate downward until the screen and keypad are facing the wall.
Note: It is normal for the system to beep when opened.
-
Remove the battery.
Note how the battery is secured in the unit before removing it. Push the plastic clips (retaining the battery) apart, and remove the battery. Use caution when removing the battery as using force can damage the mounting bracket.
- Disconnect the lead wires from the battery.
-
Remove the plastic protectors from the new battery.
If the replacement battery has plastic terminal protectors, remove them before connecting the wires to the new battery.
-
Connect the new battery.
To install the new battery, repeat the preceding steps in reverse order. Connect the black wire from the system to the black (-) terminal on the battery, then connect the red wire from the system to the red (+) terminal on the battery. The battery will have colour coding and/or symbols where the wires should be connected (red/black) to help ensure proper installation.
-
Install the battery.
Firmly press the battery back into the unit until it is held in place with the plastic clips.
-
Close the panel.
Rotate the system upwards, and press it back into the wall-mounting bracket. Replace the screw at the top of the panel (if applicable).
-
Power up your system.
Reconnect the power plug to the outlet. Replace the screw holding the plug (if it was removed). Your system is now powered back up.
-
Call technical support.
Call 1 877 267-2004 to confirm the battery replacement was successful and the device is in proper working order.
Gently remove the plastic connectors from the battery, and set the old battery aside. Warning: Do not touch any metal objects to the terminals on the battery or to the open end of the black and red wire connectors.
Shop The Source for Bell Smart Home batteries.
NOTE: Life Safety detectors have an expiry date
Most smoke detectors expire 10 years after the manufacturing date, and most carbon monoxide detectors expire after 6 years. Ensure all of your smoke and carbon monoxide detectors are up to date as they may not function correctly once expired. To check your detectors, look for an expiry date listed on the back or side of the device.
When you need to replace a detector, contact Bell Smart Home to learn about your options. If you choose, or have already chosen, to purchase a replacement smoke or carbon monoxide detector from another provider, please be aware that the device will not be monitored as part of your Bell Smart Home service.
.png)