How to manage call, text and email settings on my Samsung smartphone
- Swipe up or down to view the apps.
- Touch Phone.
-
Touch the Menu icon.
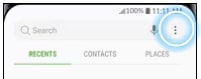
Images may not be exactly as shown.
- Touch Settings.
- Scroll to and touch More settings or Supplementary services.
-
Touch Show my caller ID.
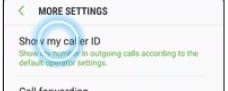
Images may not be exactly as shown.
-
Touch the desired option (e.g., Hide number).
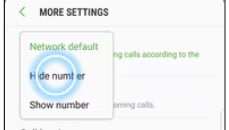
Images may not be exactly as shown.
- The caller ID option has been changed.
- Swipe up or down to view the apps.
- Touch Messages.
-
Touch the Compose icon.
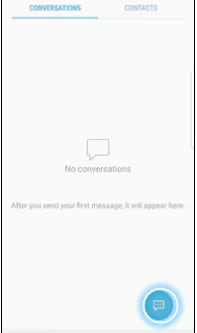
Images may not be exactly as shown.
- Enter the recipientʼs mobile phone number or select someone from your contacts list.
- Touch START.
- Touch Enter message.
- Enter your message.
-
Touch the Send icon to send the text message or touch the
+ or > icon to make this a multimedia
message.
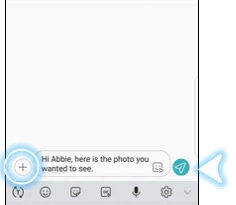
Images may not be exactly as shown.
- Touch a photo to attach it.
- Touch the Send icon.
- The message has been sent.
- Swipe up or down to view the apps.
- Touch Settings.
-
Scroll to and touch Cloud and accounts.
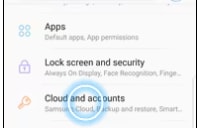
Images may not be exactly as shown.
- Touch Add account.
-
Scroll to and touch Personal (IMAP).
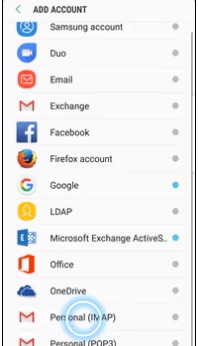
Images may not be exactly as shown.
- Enter your Bell email address.
- Touch MANUAL SETUP.
- Touch Personal (IMAP).
- Enter your Bell email password.
- Touch NEXT.
- If the email account details are automatically recognized, the account will be added. Otherwise, follow the steps below to set up the account manually.
-
Touch Server.
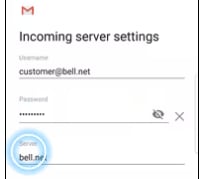
Images may not be exactly as shown.
- Enter imap.bell.net as the IMAP server name.
-
Touch NEXT.
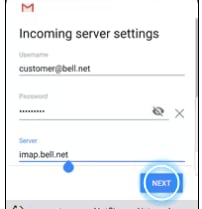
Images may not be exactly as shown.
- Touch SMTP server.
- Enter smtphm.sympatico.ca as the SMTP server name.
-
Touch NEXT.
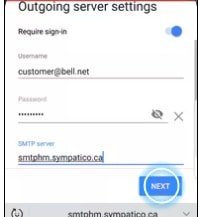
Images may not be exactly as shown.
- Wait while the email settings are verified.
- Change the account options if desired and touch NEXT.
- Change the account name and your name if desired and touch NEXT.
- Your email account has been added.
- Swipe up or down to view the apps.
- Touch Phone.
-
Touch the Menu icon.
Images may not be exactly as shown.
- Touch Settings.
-
Touch Block/Blocked numbers.
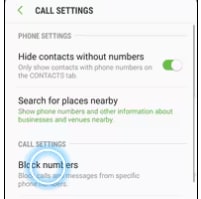
Images may not be exactly as shown.
- To add a phone number to the block list: enter the phone number.
- Touch the + icon.
- The phone number has been added.
-
To remove a phone number from the block list: touch the
- icon next to the phone number.
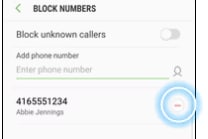
Images may not be exactly as shown.
- The phone number has been removed.
- Swipe up or down to view the apps.
- Touch Phone.
-
Touch the Menu icon.
Images may not be exactly as shown.
- Touch Settings.
-
Scroll to and touch More settings or
Supplementary services.
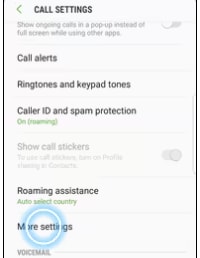
Images may not be exactly as shown.
-
Touch Call forwarding.
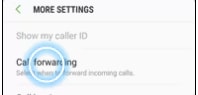
Images may not be exactly as shown.
- Touch the desired call forwarding option (e.g., Forward when busy).
- Enter the phone number.
- Touch ENABLE.
- Call forwarding has been set up. To disable call forwarding, touch the desired call forwarding option.
- Touch DISABLE.
- Call forwarding has been disabled.
Samsung Galaxy S series (S22 and higher), A series (A03s and higher), Z Flip series (5 and higher), Z Fold series (5 and higher), FE (S22 and higher) series.


Join the conversation in our community forums
Find even more support by searching topics or posting questions in our forum.
 Join the conversation by scanning the QR code.