How to install telephone wiring myself
Plan your inside wire installation by following these steps:
-
Determine your present and future needs. This will affect the choice of wire (2-, 3- or 4-pair twisted wire) that you will use. Bell recommends using a high-quality wire if you intend to install high-speed Internet.
Three-pair wire is the standard wire used by Bell for single-line installations. Three pairs of wire mean that you can easily add two additional telephone services (two separate numbers) in the future.
-
Decide where you want to install jacks to plug in phones or other equipment, such as modems, televisions or fax machines.
Keep in mind that each location should be:
- Easily accessible
- Protected from possible damage by normal activities or furniture
- Free from dampness (basement floors, exterior walls) or extreme heat
- Determine the safest and easiest route to run the telephone wiring.
-
Have the following tools at hand
- Standard slot screwdriver
- Small Robertson screwdriver (green handle)
- Needle-nose pliers
- Wire cutting/stripping tool
- Stapler (rounded staple type)
Make sure you also include the right type of wire in your installation plans.
To have Bell cables located on your property, call:
- In Ontario: 1 800 400-2255 or visit https://ontarioonecall.ca/ .
- In Quebec: 1 800 663-9228 or visit http://www.info-ex.com.
Cable locating services are now offered by outside firms that are authorized Bell agents. Technicians from these firms will not arrive in Bell vehicles.
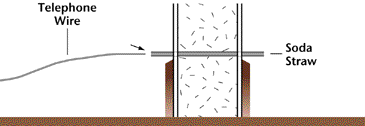
If you’re doing a construction project that involves digging, consider what phone cables might be buried in the ground. Check cable locations before putting in fence posts, planting a tree, or excavating for a pool, deck or a new addition.
What is a network interface device?
The network interface device (NID) defines the point at which you become responsible for the phone wiring within your home. Bell Canada is responsible for providing and maintaining service up to the point of the NID.
The NID is important because it contains something called a demarcation jack that is on the part of the line outside your home (the location of this jack is the demarcation point for which Bell is responsible). You can use this jack to test your phone line.
Finding the NID and demarcation jack
The NID is generally a grey box on the outside of your home. If the wiring was installed in your home before 1988, then you will likely have a grey or black telephone protector box located inside your home, and the demarcation jack will be located within 1 metre of this box.
In a multi-unit or multi-storey building (such as an apartment building), the demarcation point is at the main jack (the first point of entry) inside each unit. The main jack will be labelled Demarcation or Verification.
In most business premises, the demarcation point is located where the Bell network enters each commercial or office space.
There are two basic ways to install telephone wiring:
- Concealed wiring inside walls, as in the case of a new construction or renovation;
- Visible wiring, normally attached along the baseboard, as in existing buildings where the walls and floors are finished.
Concealed wiring tips
Use 3-pair wire for concealed installation. This will make it easier to connect additional telephone services to your home or business in the future.
Use standard flush-mounted baseboard or wall jacks, since they fit a standard electrical outlet box.
- Concealed wiring should be installed prior to the walls being covered by insulation and drywall.
- Install standard outlet boxes to hold the jacks. Attach these boxes securely to a stud inside the wall at the same level as an electrical outlet or light switch (for wall-mounted phones).
- Plan your wiring route to avoid possible damage from future construction, rubbing, overheating, dampness or contact with power wires.
- Start a new wiring run for each jack location (or see continuous loop option).
- Every run of wire should start at the demarcation point or, if phone service has never been installed at your location, at a point close to the main electrical panel. A customer distribution device, or connector block, should be installed at this location.
- Leave approximately 1 metre (3 feet) of wire hanging at the demarcation point. You will make the connections later.
- Run the wire through holes drilled in wall studs and floor joists to reach each location where you plan to install a jack.
- At each jack location, leave approximately 30 cm (12 inches) of wire coiled up inside the electrical box.
- Repeat steps 4 through 8 for each jack location.
Visible wiring tips
Two or three-pair wire can be used for visible installations. Depending on the brand of wire you buy, you might decide to use 2-pair wire since it may be easier to secure and will look better.
Use standard baseboard jacks, since they can be secured easily to any baseboard and are slightly smaller than a flush mounted jack.
- Start at the point where you intend to install a telephone jack.
- Leave at least 30 cm (12 inches) of extra wire at the planned location of the jack.
- Leave at least 1 m (3 feet) of extra wire at the demarcation point.
- Fasten the wire to the baseboard and mouldings using a staple gun (Bell recommends use of rounded staples to avoid damaging the wire). Pull the wire straight (but do not stretch it) before installing each staple.
Be careful not to drive staples or clips through the wire. If this occurs, discard the entire section of wire and start again.
Do not run wire along the floor or under carpets. Normal activity such as walking can damage the wire and cause it to break.
Do not run wire inside or near heating ducts or vents. Heat can cause wire to become brittle and break.
Avoid installing wiring in damp or wet areas such as bathrooms, along basement floors and outside walls. (CSA requires that telephone jacks in bathrooms must be a minimum of 4 m away from a bathing area.)
Keep wire at least 15 cm (5 inches) from electrical wires, fixtures and lights. Electrical circuits can cause noisy interference on your telephone line.
Do not wrap wire around nails, hooks or other sharp objects. This can cause wear on the wire over time.
Wiring options
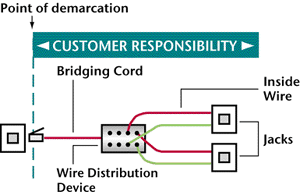
Since the wire is visible, you may not want to install individual runs of wire from each jack to the demarcation point. An option is to run wire from a selected jack location to another jack or to a conveniently located wire bridging device (connector block). This method is referred to as a continuous loop (see Figure 2).
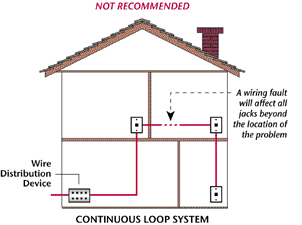
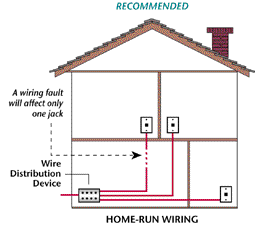
We don’t recommend the continuous loop installation. We recommend the home-run method, which uses individual runs of wire from each jack to the demarcation point. Installing the wiring this way simplifies repairs if there is a problem and permits greater flexibility if you decide in the future to change the location or telephone number working on a jack (see Figure 3).
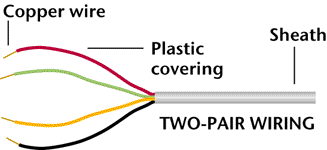
CSA-approved telephone wire is colour-coded to help you connect the proper wires:
- Using a wire stripping tool, remove about 10 cm (4 inches) of the outside plastic sheath (usually beige or grey) that bundles the wires together. Be careful not to nick insulation or cut the wires beneath the sheath.
- Using a wire stripping tool, remove about 3 cm (1 inch) of the plastic insulation from each of the coloured wires to expose the copper as shown in the diagram (see Figure 4).
Fasten the jack casing securely to the wall or baseboard using the appropriate metal or wood screws. Pull the wire through the opening in the jack casing (see Figure 5).
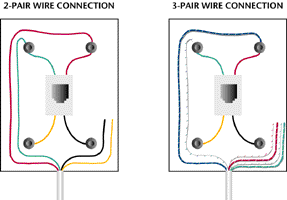
- Match each coloured wire to the appropriate terminal on the jacks as shown in the diagrams.
- Ensure that no copper wire is touching any exposed metal inside the jack or electrical box.
- Ensure that all connections are secure.
- Place the jack cover over the casing and either snap or screw it into place.
At the demarcation point
- Strip the wire sheath and coloured wires the same way you did for the jacks.
- Connect the wires that come from each jack location to the wire distribution device that's located near the demarcation jack. Be sure to match the colours correctly (see Figure 6).
If your house is equipped with a network interface device (NID) outside the building, you will have to run the wires outside of the house or office to connect them to this device. We recommend drilling a hole with a downward angle towards the outside. Use a masonry or regular wood drill depending on where you drill the hole.
Run the wires through the hole out to the device and leave at least 1 mmeter (3 feet) of wiring outside. Fill the hole with some sealant to avoid water leaks or any intrusion of insects. To connect the wires to the NID, follow the instructions printed inside its front panel.